What's that I say? The latest latest? Who knew it would be so long before the next update? Shush! It happens, and you know how frequently I get to my blog...not!
Anyways, here's what's been happening. Obviously, the sink delay has caused all things to be delayed. In my last post, I'd decided to go with an alternate sink, a second choice, and when it came in, I went to pick it up, inspecting it first and glad I did because it had damage! It had a crack in the rim. It took the vendor a couple days to get back to me with a delivery date on a replacement for that model and...hold onto your hats folks...five months!! Unbelievable, so here I've sat awaiting a sink since first-ordered in January. Twiddling my thumbs, fuming internally, frustrating to the max, not wanting to go to the local big-box hardware store for their offerings (their display models were very ripply-looking), and then on Tuesday, I get a text from our contractor who suggests I call the vendor.
I grabbed my phone, oh wait! a message...from the vendor, telling my my sink is here...my first choice sink! Are you kidding me? That's not a funny joke! No, really, first choice sink, it's here. I grabbed my son and off we went to see for ourselves because as you know, seeing is believing, right? Sure enough, it was the original and it wasn't damaged and you've never seen such elation and ear-to-ear grins on customer and vendor alike!! That sink is now sitting in our garage.
And as you know, we had also had an issue with the range hood, and that has good news too as the fourth delivery (directly to the vendor) was a good one, so it is also sitting here awaiting the return of the contractor, who is on vacation for a few more days. Folks, we may finally get this kitchen finished. It's getting close to Memorial Day, so scheduling may be met with some issues, but I'm good with that. I'm just so very happy at this point that the two problematic issues have finally been remedied. I'm only praying that the still-boxed remaining appliances have no damages...wouldn't that be a kicker!
While this all was happening, there was one wall that just wasn't up to snuff in regards to appearance with very obvious lines and pits from the taping & mudding, so the contractor's guy had to re-do that. While not 'perfect', it is much better than it was. This old house is so out of plumb that some of those types of things have had issues, or at least that's what I'm told, but I have some of my own thoughts about skills and abilities vs. 'laziness' for lack of a better word; maybe inattentiveness is better?
Again, apologies for a lack of photos, there just isn't much to show at this point. I'll be so happy when the sink and the appliances are in place because that will mean it's done, and I can clean up the dust and grit, and start figuring out where to put everything with the new cupboard and drawer layout. So, until next time, keep smiling.
Thursday, May 16, 2019
Tuesday, April 9, 2019
The Latest
It looks like I've fallen behind in posting remodel updates; are you really surprised? I bet not! Well, most of the reason is because there just hasn't been a lot done the last couple of weeks.
The tiling is all completed, and while the overall look isn't exactly what I was expecting based on the one single 18" tile sample, I'm happy with it. If you use your imagination, it's a little like walking on a sandy/stony beach all swirled together with the gray/sand colors. I'll save pix for next post...Friday?
Today is the first day any of the crew has been here in over a week finishing up setting in shelves and a few missing outlet covers, adjusting cabinet hinges, that sort of stuff.
Appliances still cannot be set because 1) no range-hood with current delivery scheduled at 4/19 with a lot of prayer and hopes that it won't be damaged. The first two were both damaged and the 3rd delivery was a sly one of sending out one of the original two that they had just restocked!! and 2) I've had to concede on the sink issue. Delivery by Kohler was pushed out further to 15 June [mega-grrrrrr] so have gone with an alternate, slightly different style but still equal double-bowl (drains are at back and close to divider rather than centered) and it should be here in about three weeks.
My apologies for lack of visual stimuli.
Tuesday, March 12, 2019
Remodel: Weeks 3 & 4
Hmmm, I'm not sure how I missed Week 3, but will include photos now; I'm even behind on Week 4! Because of that, this post is a bit photo heavy, but with little commentary, it should be easy to skim through :)
Great progress has happened over those two weeks, and it's now been quiet since mid-week while we await the countertop fabrication. I received word last night that it will be installed today though I don't know what time to expect.
And that ends what has been done over the past two weeks. Today is the countertop, and after that should be the backsplash tile and then the floor tile. The big hang-up is still the delinquent sink - no updates as to its arrival as yet. To accommodate it, the countertop will now have to be cut in place. Not ideal but doable. Contractors and their subs have schedules so it wasn't possible to delay the counter fabrication, which would also have affected the tile man, and the finishing man and the appliance installation. We'll have a 95% finished kitchen that will be mostly usable, just no sink and no water; and that could be well into April.
Great progress has happened over those two weeks, and it's now been quiet since mid-week while we await the countertop fabrication. I received word last night that it will be installed today though I don't know what time to expect.
 |
| We left the ceiling fan/light in place so it's covered to protect from the ceiling spray treatment. |
 |
| Walls have been mudded and textured - nasty stuff, made my eyes burn, smelled awful and added humidity.It took awhile to dry as our weather was also quite wet during this process. |
 |
| The additional pantry area mudded and textured. |
 |
| That "Escher" issue fixed as best as possible - not perfect, but certainly not as noticeable. |
 |
| Paint! We have paint. I chose a color by Behr: "Perfect Taupe". I was concerned it may be too gray and too dark, but took my chances, and am happy I did! |
 |
| More paint. |
 |
| And more paint. Some areas of course were not painted as they'd just be covered up with the cabinetry anyway, so why paint? |
 |
| Oh be still my heart! The first part of the base counters went in. The oak side cabinetry, and oh my, how I love it. And look at all that storage space! |
 |
| From a slightly different angle. |
 |
| Cabinetry for the kitchen proper awaiting install, safely wrapped and protected. |
 |
| And more hanging out in the garage. |
 |
| It's getting installed! Be still my heart x 2! Oh yes, I'm loving it! |
 |
| The refrigerator surround and base cabinets on either side. I won't say how expensive custom cabinetry is, especially that skinny little cabinet at the end along with it's upper not yet installed in this photo. The lower one will house my baking sheets, etc. The upper? Probably canned cat food, but who knows! |
 |
| Refrigerator surround and cabinet above sans doors. |
 |
| Cabinetry to right of refrigerator surround. |
 |
| Head-on view of skinny cabinet. This lower & upper cabinet was an afterthought as there was just over a 12" space that was crying for something to help balance that side of the wall. |
 |
| The cabinetry and drawers between where the sink will be on the left and the range on the right. |
 |
| Cabinet and drawers to the right of the range. |
 |
| The oak bank of cabinets! I am so pleased with them, and so happy I went with oak there and white in the kitchen proper. My goof? Not moving the ceiling light, and I'm fed up with added costs (always with a remodel) so it's staying where it is since the ceiling has already been done. The empty space at the right (~36") and behind the refrigerator (which is the old one and not staying) was intentionally left that way as our oak China cabinet will be along the wall where the fridge is, and it is large so would not have left room for cabinetry to extend to the wall. My thinking is that should we ever get rid of the China cabinet and/or move, the 36" space could easily house a small desk or it would not take much to put in a small desk/work area in that corner. I know some folks like to have such a workspace in their kitchen/dining area. |
 |
| All I can do is smile :) That's the space for the range and range hood. The entirety of the wall-space between the upper and lower cabinetry will be tiled. |
 |
| The rest, where the dishwasher will fit there at the left end, the sink directly below the window. At the very left end is yet another really skinny cabinet area, seriously skinny. |
 |
| The opposing wall next to the refrigerator cabinet is a shelf for the microwave. Are you asking where the electrical outlet is? Yeah, about that. Well, the electrician had a really good (?) explanation, at least to him but maybe not so much to me though it could make sense. As often is the case, the cord on a microwave is on the back, so he has found it better to run the cord UP through a hole in the cabinet above to an outlet placed at the back of the cabinet, otherwise it prevents being able to push the microwave fully back on the shelf. I suppose he could have gone to the one below, but that would lessen the available outlet for anything on the counter, and the upper one is a separate circuit for the microwave. So, OK then. |
 |
| The crown molding has been added, and it looks great. And the Perfect Taupe paint color? I love how looks against both the oak and the white cabinetry. It's a very good 'modern' neutral in my pseudo-country kitchen. |
 |
| Close up of crown molding. |
 |
| Crown molding added here too, and the area is cleaned up. |
 |
| Crown molding adds so much to the look, so impressive. |
 |
| We know in an old tract house, and one that's been through two major earthquakes, that due to settling and imperfect construction walls aren't always true, as evidenced by this image. Nice gap on the right. I'll have to find out if there's a plan to 'disguise' it. There was an even larger one on the oak side where it met the wall by the new door, and it was disguised completely. |
Monday, February 25, 2019
The Remodel: Week Two
We've made it through the first two weeks, and hopefully those were the worst two weeks. I say 'worst' because it was so very noisy, and the dust from demolition, and new drywall is horrendous even with precautions taken by putting up plastic over the doorway. The odor from the mud and taping of the drywall as well as the dust has irritated my throat terribly, Nick's too! The sound of the jack-hammer removing the tile for a couple days was pretty intense, the upstairs floors were even vibrating - our poor kitties were in a rough spot and having a tough time.
Here are the photos from the past week:
Now to try to look at things a little more positively rather than the seemingly constant of added costs:
With all of this going on, some very chilly and wet weather for SoCal, our furnace decided to go on the fritz, AGAIN! We just put $1400 into it in November. I called the furnace guy first thing this morning, and he's 'hoping' he can get someone out this afternoon. In the meantime, I'm sequestered in my Creation Station with a space heater, and one of the two cats who is currently curled up in a box after being a real pesky pain all morning. All three of us were in our respective separate room areas yesterday with individual space heaters running and managed to trip the breakers...not good! So now I have a question in to our contractor and his wiring guy as to why it would also have taken down the breakers for the downstairs which he "re-circuited" in order for us to not have to worry about running the microwave and toaster oven at the same time which would previously throw the breaker too. Indoors outside of these rooms it's been dropping to about 55º when it's mid-30s out. I am thankful I'm not living in a colder climate.
Until next week, praying for a smoother week, and for a furnace fix that doesn't cost another small fortune!
Here are the photos from the past week:
 |
| concrete slab - it has a thin, known crack which isn't obvious here but runs along the wall; we learned of it when we had the previous tile placed |
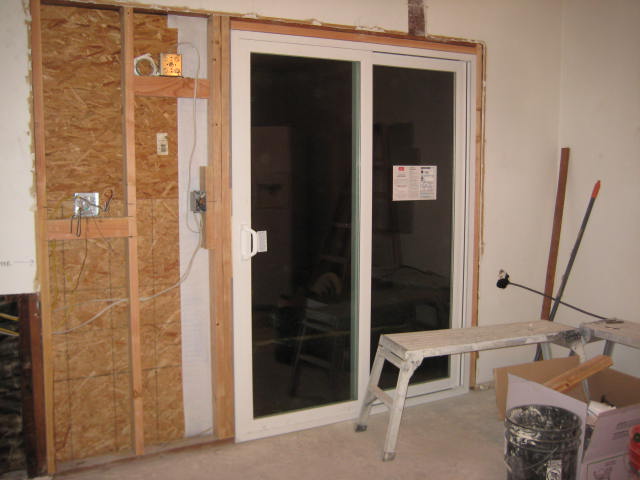 |
| Our new 5' sliding door. It never made sense to me that there was no exit from the kitchen to the patio where the grill and table are; instead, one would have to carry supplies and foods from the kitchen, down the hallway, through the 'library' to the sliding door there to access the patio - I often had to wipe up unobserved spills from whomever was carrying food out. This is where there was an 8' wide window. At first I thought the 5' was too narrow and wished I'd gone for a 6' but I'm now thinking this is perfect. |
 |
| Some rewiring needed to be done to fix some circuit issues as well as put in place for the new range, range hood and add new plugs for above the counter...some additional costs were involved. |
 |
| Ruh, roh. We spied a small leak in the copper pipe that had been installed in a whole-house repipe about 22 years ago. The pipe was also too close to the wall board so it was cut, moved and repaired...at additional cost of course. |
 |
| Some of the wiring, gas lines, old water lines, old hood vent...and NO insulation. The entire house has NO insulation anywhere (except the bathroom walls that were remodeled seven years ago, and now this wall has some that the contractor added.). |
 |
| New drywall added and the new outlet for the microwave. Why so high? The cabinet will now have to have holes made through the bottom, the shelf, and the back. When I asked the contractor, it has something to do with code/legal positioning of plugs. Go figure. It would probably help if I explain that there will be a 2-shelf cabinet with door here, with a built-in shelf below it for the microwave rather than the microwave sitting directly on the counter. |
 |
| Drywall patching in place. For the cost of this process all of the old should have come down and all new gone up! |
 |
| This side did get a little more all new. |
 |
| A thin strip of drywall was removed in order to fish the new electrical through for the outlets for the cabinetry and counter going in along this wall. Nope, no insulation there, and none going in. I should have had that included in my original plan - remove all drywall and install insulation! That solid wall is a west wall, and it takes the full brunt of afternoon southern California summer sun; hoping that the cabinetry will act as a little bit of insulation. The dining room/kitchen does have the best A/C-furnace vent in the house! Intentionally! |
 |
| Mudded and taped, looking nice. |
 |
| This is that end wall where the copper pipe leak was, it separated the kitchen from a bathroom and is where the old built-in oven was before the bathroom remodel seven years ago. When the worker left on Friday, he said to me that he didn't realize until he was ready to leave that there is no cabinetry going there, so he will have to do some re-work on the wall to make it look uniform and 'pretty'. |
 |
| A wider view of that area. At left, behind the door, can be seen the second pantry area, and the gas line that feeds the furnace up on our roof. |
 |
| And here's our Escher-style conundrum. I suppose in a house that was built in 1966, between land settling and going through two major earthquakes (Sylmar & Northridge quakes), and that it's a tract home where attention to detail was less of a concern than deadlines, some oddity is to be expected. Looking at the soffit area that needs to remain because a heating duct runs through it down the hall ceiling to the bathroom and the library, it's easy to see that the left side is deeper and the right is shallower. However, if you look at the pantry doorway, it's pretty close - with measuring it's only about 1/4" difference at the door - over an inch at the edge. Moving along to the next photo... |
 |
| Looking head on from this direction, it's squared up pretty well above the hall doorway. So the question is, what is out of alignment? The doors? The ceiling? The floor? And an even bigger question, how on earth to fix it so it isn't so obvious? The contractor hasn't yet seen this for himself, but has heard about it. And the frustrating part, the duct really only takes up about a one-foot square in the back left side of this soffit - so, tear out the soffit completely except that one-foot square? That would look rather odd. Take it back to just a foot in front of the door? I'm sure we'll be charged more for that too! As we would if making it diagonal from the left edge of the pantry door to the right wall of the hall door. |
 |
| Looking into that new pantry space. It will have 'matching' shelves to the existing pantry, while working around the gas line, that I'd hoped they'd be able to 'enclose' in some manner. An opening needs to remain though for the shut-off valve at the bottom near the bend. That'll probably add more cost too, as it would have to have had them relocate it. Sometimes it feels like "nickel and dime" with adding several zeros behind the 5's and 10's. |
 |
| These beautiful daffodils are giving a good showing this year. And with that new sliding door, it's so much easier to see them and get out to them. I really need to hone in on my gardening, it's been seriously lacking in recent years. These bulbs came from my Mom a very long time ago, before her passing in 2014. The squirrels devoured the tulip bulbs, but there is a hyacinth mixed in there but it's only just showing it's head above the soil level at this point. I hope it's the yellow one, but I truly do not know or remember. |
 |
| These arrived today: the new refrigerator, dishwasher, range, range hood, and respective attachment lines for the three main items. |
 |
| This goes back to our getting ready, we had to make a path for the workers to get through the garage. There was a path there, just not wide enough to accommodate a wheel barrow which they use to haul all the debris out. The mish-mash of boxes include everything I packed up from the kitchen seven years ago as well as currently, some boxes of stuff to determine what to do with - whether to store, donate, sell - and some stuff clearly headed to charity. |
 |
| The contractor's 'dumpster'...good-bye old, crummy dishwasher :) |
Until next week, praying for a smoother week, and for a furnace fix that doesn't cost another small fortune!
Saturday, February 16, 2019
The Remodel: The First Week
Well, here it is Saturday and I haven't posted any of the promised photos. The demolition started as planned, on Monday 2/11. By Thursday late afternoon, the demolition, rewiring, some plumbing stuff was pretty much a done deal. Friday was inspection day which went along without a hitch and the contractor (who grumbles about 'wasting time' waiting for inspectors), was pleasantly surprised to not have to wait as the inspector was on time, and had signed off on this portion within only a few minutes! On to the pictures with brief comments on them.
Since Friday was only an inspection day, it was quiet, as are today and tomorrow before work resumes on Monday. Our kitties are rather stressed with this and remain upstairs, often hiding under the bed. There is no good place to get completely away from all the noises (nor the dust for that matter). The door from the kitchen area to the hallway is closed but it's slatted so dust still creeps through even with the crew taping plastic over it. We're letting them use our restroom so they still need to come through the door which also tracks dust and dirt through; all to be expected.
I'll be spending some time today trying to clean up some of the dust from everywhere before it attacks again. It's also been quite cold in the house while the crew has the garage door open and the door from the dining room into the garage as well. Because of that we only have the downstairs heat zone set to around 65. We've also removed an 8' window and replaced it with a 5' sliding door, so that opened things up and cooled the house down too. No insulation in our walls...at all!! That really wasn't a surprise though knowing how cold indoors that it gets in the winter and how hot in the summer, and that's why we had A/C installed...those hot southern California summers.
 |
| Before: original 1966 kitchen cabinets and brown range hood. |
 |
| Before: front shot of same cabinets. I did like the flat top and front of the range hood; it gave me a place to set salt & pepper and to use magnets to hold a recipe while I cooked. The fan no longer worked without fear of catching fire - too many decades of grease drifting into it. |
 |
| Before: lower cabinetry; face plate has been gone for a long time. The little drawer was stolen from another, lesser used area when the original one fell apart. Bread/cutting board has also been gone for a long time. We discovered the counter top (almond colored formica) was probably new ca. 1991 - about the time Marty bought the house. We had the tile put in about 21 years ago after a water leak flooded the entire kitchen/dining room but I learned to hate the edges & the grout which could only be cleaned with a brush on your hands & knees...grout was not originally 'brown' but a light cream...what WAS I thinking? |
 |
| Before: upper cupboard at right of sink and above where coffee pot was; very worn. |
 |
| Before: the sink was not centered under the window, off by about 2"; that will be changed. 15+ year old dishwasher, you can see all the rusted (some missing) prongs. The camera actually makes the cabinets look better than they were. A chip is showing just to the right of the dishwasher on that faceplate. |
 |
| Before: A narrow area at the right of the refrigerator. These drawers were probably in the best shape of anything in the kitchen. The board on the right is where the wall oven was SEVEN years ago when we did the two bathrooms (upper/lower) which we had to remove because we added a shower into the lower bathroom which previously had only a toilet and sink/vanity. |
 |
| Before: a closer look at how beat up the little drawer is...ugh, and how dirty the top of the pieces look even though I would wipe them frequently. And knobs, ugh, I have never cared for these. Things get caught on knobs. The drawers got caught on the knobs at this right angle if they weren't close, and they never closed nicely. A galley kitchen will not have this issue. |
 |
| Before: the fluorescent lighting; this, a light over the sink and the over the range hood light was it in the kitchen. I had a great dislike of these fluorescent bulbs, as did Marty. Their brightness usually failed quickly and continued to fail. At times, there was barely enough light in here to see before I could get Marty to replace them, then it was sunshine bright for about a month before dimming (or getting used to it) to a fairly constant level that eventually dimmed again. And we all know what those tubes do when start to go bad, flicker, hum, even smell! |
 |
| Before: This was the vent for the old swamp cooler that was changed to A/C over a decade ago with different ducting, but was never removed. It is now gone along with a segment of the tube above it; a segment remains which runs through an area within my closet in the master bedroom - maybe someday it'll be gone too if we ever get the master bath done and reconfigure some closet space. |
 |
| Before: This is my pantry. All that's changed here is Marty removed the popcorn ceiling, and the floor tile was removed. It will get repainted, but I like it as it is. To the right, behind the slatted door is the space where the furnace was. When we had the A/C installed, we chose a rooftop combo unit, so that space has remained an ugly hole ever since after the removal of the old equipment. To save on cost, rather than open up the wall between the pantry and that space, the space will have it's own door and will have similar shelving, ceiling treatment and floor tile installed. It will house those small appliances and some larger pantry items that have been stored elsewhere. At the left of the pantry door, you can barely see the knob/lock for the door going into the garage. |
 |
| During: this is the ceiling of the pantry after Marty wet and scraped the gunk off, disposing of appropriately as it had 3% asbestos - something we learned at the time of the water leak when we had the dining room ceiling repaired. At the time, our budget only allowed for encapsulating rather than professional asbestos removal. Personally, I think the asbestos laws are far too stringent and overreaching/overkill for the reality of the carcinogenic results. I recognize the issues with asbestos, but also that the common consumer was generally not affected. Those in the manufacturing process...different story. |
 |
| During: some of the hard materials removed :) |
 |
| During: after all the cabinetry and floor tiles removed and areas opened up for electrical and plumbing access. The brown stains on the walls? That's the back of the inside of the cabinets - guess that was a pretty standard method in the 1960s...don't have a back, just paint or stain to match. What's funny, is the end cabinet, it was only stained on the upper shelf level and not the two lower ones on the one side. There's that board where the oven used to be...g'bye! |
 |
| During: before the tile was removed showing where the peninsula was, which is where the burners were on the counter. |
 |
| During: that cupboard |
 |
| During: the leftover hole from the swamp cooler vent removal. The old (no longer used) galvanized water pipes that ran through the ceiling. Above that is the second floor floorboard. A different opening showed me why our upper floor creaks so much. The nails holding the flooring plywood to the joists/stringers/2x4s (?), barely caught the boards at all. They went in at an angle and caught a very small portion of the top of the wood before coming out the side. |
Since Friday was only an inspection day, it was quiet, as are today and tomorrow before work resumes on Monday. Our kitties are rather stressed with this and remain upstairs, often hiding under the bed. There is no good place to get completely away from all the noises (nor the dust for that matter). The door from the kitchen area to the hallway is closed but it's slatted so dust still creeps through even with the crew taping plastic over it. We're letting them use our restroom so they still need to come through the door which also tracks dust and dirt through; all to be expected.
I'll be spending some time today trying to clean up some of the dust from everywhere before it attacks again. It's also been quite cold in the house while the crew has the garage door open and the door from the dining room into the garage as well. Because of that we only have the downstairs heat zone set to around 65. We've also removed an 8' window and replaced it with a 5' sliding door, so that opened things up and cooled the house down too. No insulation in our walls...at all!! That really wasn't a surprise though knowing how cold indoors that it gets in the winter and how hot in the summer, and that's why we had A/C installed...those hot southern California summers.
Subscribe to:
Posts (Atom)